Here is my final video.
I hope you enjoy it :)

Friday, 9 November 2012
DSDN 112 - Semi-final Video.
Here is the semi-final video I did for the 3rd project. It was missing the tank render I wanted to add to it.
Sunday, 14 October 2012


Wednesday, 10 October 2012
Project 3 - Shutter Release.
And of course I cannot forget to mention the feature that made my photos so successful was my shutter release cable. Creating very still and focused photos.


Project 3 - Lamp Colours.
Here are the different lamp colours I experimented with. (one broke during the process)
They all gave me a very strong colour and gave me more than satisfying results :)

They all gave me a very strong colour and gave me more than satisfying results :)

Tuesday, 9 October 2012
Project 3 - Lamp Torch.
So because I wanted to use coloured lamps, I searched for some kind of torch that I could use that I coud attach a lamp to. I bought this one but the plug did not match the lamps one so I had to make my own one. I figured it could be very simple and I decided to make my own one. I bought a couple of extention cables and a lamp clamp. I cut the extention cord and attached the inner chords to the clamp and it worked!
Here are both the worklight I tried to use and lamp torch I made:


Here are both the worklight I tried to use and lamp torch I made:


Friday, 5 October 2012
DSDN 112 - Project 2. [200 Words]
Trapp:
The Trapp application moves a little bit away from the
ordinary and brings to the table a new interaction experience when comes to map
tracking. Instead of just finding your way to specific locations, it allows you
to leave a message in form of a trap for the public or for selected friend(s)
when going through a map path. The aim was to create some kind of interaction
in the application that added to the straight forward functionality of the app.
This way you can keep in touch with your friends and leave them unexpected and
surprising messages as they make their way to class. Another idea behind the
app is to make the way around the campus a little bit more interesting. Instead
of crying your eyeballs out because you have to go to class, you might just
look forward to going to class just to find your traps/messages on the way. The
trap function is also not the only entertainment the app has to offer. It also
allows you to choose different vehicles to go through your selected path and
each different medium of transport will have a different speed and will give
you a different ‘expected time’ to reach your destination. The reasoning behind
this idea is to add a little bit of humour to the application and allow you to
play around with the different options available. In general Trapp works really
well and offers the public an original idea yet to be experienced and maybe
even further developed.
Wednesday, 3 October 2012
Projet 3 - Shuffling Costume.
Here is a good example of a common shuffling costume worn by a lot of the dancers. Those glowing lights represent the concept that I would like to explore but much more intensively.


Tuesday, 2 October 2012
Project 3 - Inspirations.
Here is some light exposure work that inspired me in my project.
Light Dresses by Atton Conrad:


Cars Lights:

Light Graffiti:

City Outline Lights:

Light Dresses by Atton Conrad:


Cars Lights:

Light Graffiti:

City Outline Lights:

Project 3 - Proposal Changed.
So after playing around with Light I came up with a much better idea for my project. Even though having manipulated shadows is a great idea I came up with an idea that I relate to my past and can explore a lot with light.
I will be using light to express the meaning behind the famous Malaysian dance 'Melbourne Shuffle'. When I was in my first year of highschool a malaysian friend of mine tought me how shuffle and explained to me how much it meant to him, he also gave me a shuffling hoodie called the 'Gothic Clown'. He said that the shuffle brings people together, is a way of expressing your creativity, and also a new form of body language. It relates a lot to colour; many of the shuffling costumes have glowing in the dark lights as the colour and drawings represent the dancers' personality. I figured light exposure would effectively express the meaning behind the dance. I plan to experiment with several different light colours and show dance movements from the actual dance while wearing my 'Gothic Clown' shuffling hoodie.
Sunday, 30 September 2012
DSDN 144 - Light Object.
So ive been practicing light exposure and here are the different results I achieved:


Friday, 28 September 2012
Project 3 - Inspiration [Tim Noble & Sue Webster]
I also looked at Tim Noble and Sue Webster's work. They have some pretty trippy stuff.


Thursday, 27 September 2012
Project 3 - Inspiration [Shigeo Fukuda].
For inspiration I looked into some work by Shigeo Fukuda. His art is really amazing.


Tuesday, 25 September 2012
Project 3 - Proposal
So me and Zak Brown went to the waterfront for our first shoot of the project and discussed several different ideas that could be used for the task.
We looked at reflections, silhouettes, different lighting colour, etc.
My idea is to focus on silhouettes, as in strong shadows. However, my aim is to set up a stage with manipulated objects that will look like real things when the shadows are projected. For example, I could use wire to make it look like a spider. This way I could use the shadows to express any message/meaning I want. Another interesting thing that clicked when I did the first shooting is that objects such as glass and plastic can project colourful shadows, which could add a lot to the aesthetic of the photo.
Monday, 17 September 2012
DSDN 144 - Final Video.
Here is my final stop motion after editing it on adobe premiere and photoshop. I learned some useful and helpful functions on photoshop and premiere when doing this project.
Sunday, 16 September 2012
DSDN 144 - Sound.
So for sound I recorded the sound of a real tattoo machine and put it at the start of the video. It adds a feeling to the movie.
The song I chose to be played on top is a very nice blues song called "Black Magic Woman". The reason for choosing this genre and song is because when I went there to do my stopmotion, Charlie had set up a radio station that only played blues songs similar to the one I chose. I wanted to express the feeling I had when I was there watching the tattoos being done by adding little touches such as an appropriate song and sound effects (tattoo machine).
Here is exact link for the song that I used.
Saturday, 15 September 2012
DSDN 112 - Project 2.
Here are my Wireframe made for the interim presentation and they first concept frames that I intend to use as my application's aesthetic.


DSDN 144 - Tattoos
Taking pictures of the whole tattoo process was very fun and also a learning experience. I learned that you should never refer to a tattoo machine as a "machine gun" because that is what its called in prison and therefore can be quite offensive around tattoo artists. Also learned that the tattoing machine only cuts up to the second layer of the skin out of eight. These little facts were very insightful and interesting to know. They have several colours for tattooing and a lot of them with very unusual names, such as the "Zombie Vomit" colour.
So I had two very nice volunteers, Sara and Mel. They planned out two very awesome drawings and they were completely fine with me taking photos of the proccess. They both got tattoos on the same spot.
Sara:

Mel:

So I had two very nice volunteers, Sara and Mel. They planned out two very awesome drawings and they were completely fine with me taking photos of the proccess. They both got tattoos on the same spot.
Sara:

Mel:

Friday, 14 September 2012
DSDN 144 - Stop Motion Practice.
So I went to the City Tattoo place on Cuba Street and they allowed me to take photos of tattoos being made. Meanwhile I've been practicing the stop motion in different ways. It's still not 100%. I want to buy a shutter release for my camera tomorrow so the frame is very still. I also have to find out how to get the photos backwards and have two videos going on at the same time.
Thursday, 13 September 2012
DSDN 144 - Tattoo City.
So after talking to the head tattoo artist (Charlie) from Tattoo City on Cuba Street, he allowed me to come in on Saturday and take photos of his tattoos being drawn as long as the customers were okay with it. He was very nice and considerate.


Wednesday, 12 September 2012
DSDN 144 - Inspiration.
This video is really good for explaining the tattoo time process and how long it averagely takes and why.
How Long Will a Tattoo Take? -- powered by ehow
How Long Will a Tattoo Take? -- powered by ehow
DSDN 144 - Machine Gun.
For a deeper understanding of the practice I decided to look up how the tattooing machine gun works and how it is composed.
So here is a diagram of each of its main pieces. But you will also see cool looking ones with crazy designs and customed ones.


DSDN 144 - Video Inspirations.
So after I had that idea I decided to look up for tattoo stop motion videos. I found a lot of them on youtube and went through different perspectives and lightings. The following videos helped me understanding the process of a tattoo. I also picked very good quality and poor quality ones to compare different shooting techniques.
DSDN 144 - Proposal [Changed].
So I decided to change my idea after discussing it with James. To be more interesting and effective I will create stop motion movies of tattoos being made and show the development throughout a short period of time. I will have two or three tattoos being done at the same time and showing in the same screen. One of them will be backwards, and the other one(s) normal. Tattoos usually take a long time to make but they always look awesome in the end. To have the whole process shown in little time could be very interesting and also be a good way of learning about a tattoo experience. I also want to add some heavy music with the sound of the machine gun fading in and out every now and then.
Tuesday, 4 September 2012
DSDN 144 - Considering Spots.
Here are some of the spots (mostly along the waterfront) that I considered for my Project. All of them have seats which people would seat on and make me a drawing relating to Time. By having the same position all the time I will be able to overlay the photos and achieve the seating hierarchy.


Wednesday, 29 August 2012
Project 2 - Inspirations.
Here are some inspirations that I really liked when researching.
They are all made for iPhones.

The graphics are decent, and the voice part is really helpful when you are driving.
Even though AmAze pops up a screen to buy the full version, there really is no need to do it. Simply tap on “keyword” or “local search” and you will get what you request!
If you need to really keep track of where you are going and how much time and money you are spending, this is the perfect app for you!
Automilez has a sweet interface, but you do need to create a free account first. Then you simply add in your odometer reading when you start and click “stop” when you are done!

Free GPS
This is a no-frills GPS system that works quite nicely. It is totally simple.
There are no bells and whistles.
GPS is so simple; you can tag locations fairly easily by clicking on “Make Current Position New WayPoint.” You can also enter in a WP manually.

GPS-R
Not only does it track where you are going, it also tells you when you are near something that you have to do…like buy milk or take back library books.
This is an awesome mashup between a to-do list and GPS!
GPS-R is sweet because it will remind you of certain tasks when you are near them geographically.

iWant
this helps finding gas and places to eat.
Even though iWant wants you to buy the full app, don’t…the free version is awesome. You can find anything around you within seconds!

GPS Logbooks
This app is pretty wicked if you fly on a plane quite often.
You can share your flight log book with the world using this handy dandy app.
This is a cool app for travelers! As you are flying, simply write a note, and it will update your online logbook with where you are and when the post was created.
 Waze
Waze
This is my favorite one! It is a social networking meets GPS application, and it allows you to share your location details with Wazer friends.
The awesome part is that you can report traffic jams to others or locate nearby Wazers.
Finally, Waze is a social appie that lets you connect with other Wazers via chatting and map pinning. The BEST part, though, is that its main purpose is to help you navigate traffic.
They are all made for iPhones.

AmAze GPS
AmAze GPS is a free turn-by-turn voice GPS app for the iPhone. You can view in 2D or 3D, and it offers many of the features of expensive GPS apps!The graphics are decent, and the voice part is really helpful when you are driving.
Even though AmAze pops up a screen to buy the full version, there really is no need to do it. Simply tap on “keyword” or “local search” and you will get what you request!

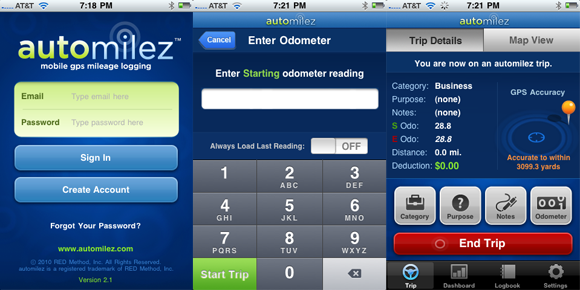
Automilez
This is a perfect app for people who need to track mileage for reimbursement.If you need to really keep track of where you are going and how much time and money you are spending, this is the perfect app for you!
Automilez has a sweet interface, but you do need to create a free account first. Then you simply add in your odometer reading when you start and click “stop” when you are done!

Free GPS
This is a no-frills GPS system that works quite nicely. It is totally simple.
There are no bells and whistles.
GPS is so simple; you can tag locations fairly easily by clicking on “Make Current Position New WayPoint.” You can also enter in a WP manually.

GPS-R
Not only does it track where you are going, it also tells you when you are near something that you have to do…like buy milk or take back library books.
This is an awesome mashup between a to-do list and GPS!
GPS-R is sweet because it will remind you of certain tasks when you are near them geographically.

iWant
this helps finding gas and places to eat.
Even though iWant wants you to buy the full app, don’t…the free version is awesome. You can find anything around you within seconds!

GPS Logbooks
This app is pretty wicked if you fly on a plane quite often.
You can share your flight log book with the world using this handy dandy app.
This is a cool app for travelers! As you are flying, simply write a note, and it will update your online logbook with where you are and when the post was created.

This is my favorite one! It is a social networking meets GPS application, and it allows you to share your location details with Wazer friends.
The awesome part is that you can report traffic jams to others or locate nearby Wazers.
Finally, Waze is a social appie that lets you connect with other Wazers via chatting and map pinning. The BEST part, though, is that its main purpose is to help you navigate traffic.
Subscribe to:
Comments (Atom)